Notes from my first play test of the Samurai era wargame rules I recently posted.. I didn't have my camera with me, so no photos yet.
After organizing my Feudal Japanese figures last night, I set out a few to represent some Clans of two different armies, and I went through the clan activation part of the game. Some observations-
First, having markers on Clan Leaders showing their Command value is a huge time saver. Same with Bushi.
Second, if a unit is less than half strength and loses a morale test, it should disperse - otherwise small units might be littering the table forever.
Third, ninjas. I have some ninjas in my collection, and I need to include ninjas. Just a few, like garlic on pizza, should go a long way.
Melee combat - I'm not sure I am crazy about having melee resolved after one dice toss. I might change to a system with pushback and Bushi tests.
Not sure about the need for formations. I included rules for a column (to move through a village, mountain pass, or bamboo forest) but otherwise, just in a battle formation.
Basing. I am torn between a square base method and a regular linear WRG type method, but I plan to rebase the collection.
Here is a scene from a TV drama showing a dramatization of the cavalry charge during the battle of Nagashino (1575), against the first recorded use of volley fire in Japan. Interesting, but great images of armor and horse equipment.
http://youtu.be/bIs3ibPgosE
And, for further research, the movies of Kurosawa are always welcome. This is a clip from Ran, showing a unit of Ashigaru firing from under cover and disrupting a cavalry charge. Great imagery of Sashimono, but the representation of units is very fluid compared to how wargamers typically represent bodies of troops. Kurosawa might not be strictly historical, but it is very inspirational imagery.
https://youtu.be/m4Sc32qDzXU

musings and meanderings concerning the many gaming activities in the land of chuck
Wednesday, November 18, 2015
Tuesday, November 17, 2015
From the Sky we Came - Samurai Period Miniature Rules
I wanted to come up with a set of miniature rules for playing out 15mm battles between armies representing the Samurai Clans struggling for position with each other during the period of the 16th century (the Sengoku period, which is typically from the mid 15th century, through the end of the 16th), roughly ending with the battle of Sekigahara (Oct 21, 1600).
 | |
| Detail from the Battle of Sekigahara |
The name of the rules ("From the Sky we Came") comes from a line in a death poem written by Hôjô Ujimasa. Ujimasa died (was forced to commit suicide, along with his brother) in 1590, after losing Odowara castle to Toyetomi Hideyoshi. Ujimasa had been the head of the Hôjô clan, so upon losing his clan's castle to his clan's enemy, he was forced to commit sepuku. Before doing so, he wrote the following death poem:
Autumn wind of eve,
blow away the clouds that mass
over the moon's pure light
and the mists that cloud our mind,
do thou sweep away as well.
Now we disappear,
well, what must we think of it?
From the sky we came.
Now we may go back again.
That's at least one point of view.
- Hôjô Ujimasa
 | ||
| Odawara Castle |
Below are the rules. Keep in mind these are a playtest level prototype, and there might be some interesting combinations resulting from using these. They do seem to be pretty playable. Pictures of the playtest are coming.

From the Sky we Came
Units and organization
Units are roughly of two types, Cavalry (3-4 stands per unit) and Infantry (6-8 stands per unit). On the table top, Cavalry is always represented either in column (one stand wide, for movement purposes), or in a single line (one stand deep, 3 or 4 stands in width). Infantry is also either in column (one stand wide), or in line (two stands deep, either 3 or 4 stands in width).
Units are organized by clan (roughly), with a Clan leader being in charge of from 3 to 8 units per clan. Each clan will have a Clan Leader, as a separate piece, distinct from the units. Each side, will have an overall commander, or Army General.
Unit Types
Units are split between mounted and infantry.
Mounted units may be either:
- Mounted Warrior Monks
- Mounted Samurai
- Warrior Monks
- Samurai
- Ashigaru
- Peasants
Infantry must be marked as being armed with hand weapons (katana, nodachi), pole arms (yari, naginata, etc), arquebus, or bow.
Samurai infantry units may have two categories of weapons - such as hand weapons (swords) and bow.
Command and Bushi
Each command stand (either Clan leader or General) has a Command rating. This is a rating of that leader's ability to command troops in battle. It will be an 8 for a Clan Leader, and a 9 for the General, but could be modified by a scenario or based on a historical battle.
Command is used by the command stand to (1) activate moves, (2) rally routing troops, (3) reform disordered troops.
Each unit has a Bushi rating. This is a measure of the unit's general martial spirit and willingness to fight. In the game, it is used for a test to see if the unit will (1) close to contact in a charge, (2) stand up to a charge from the enemy, and (3) charge lesser units if ordered to do so. The first two tests (charge, and stand) are made against a unit's Bushi rating whenever a charge is ordered.
The third test must be made by a Samurai unit that is ordered either to stand, or to charge another unit, when an enemy Samurai unit is within charge distance. If the this test is made against bushi when the Samurai unit is activated to move, and the unit Passes the test, rather than do what is ordered, it will instead move (at charge speed) towards an enemy Samurai unit within charge distance.
Unit Bushi Rating
Samurai - 9
Warrior Monks - 8
Ashigaru - 7
Peasants - 6
Optional - When a unit is required to take its first Bushi Test, roll 1d6. If the result is a 1, then the unit has its Bushi modified down by one point, and if it is a 6, then it is modified up by one point. Keep track of this, as the unit will have to make tests against this Bushi value throughout the battle.
Turn Sequence
At the beginning of a turn, the two Generals will each roll 2d6 plus the number of Clans they still have under their control. The high roller will then activate his first clan.
Activating a clan is done by rolling against the Command target of the Clan Leader for that clan. If successful (by rolling equal to, or less than the Command number of that Clan Leader), then the player rolls two d6, and chooses the highest of the two dice. That is the number of actions he has for the units in his clan.

If a player misses the roll against his Clan Leader's Command number, then that Clan may not activate this round. It is now his opponent's opportunity to nominate a Clan Leader to roll for. This alternates back and forth, as long as both sides still have Clans to activate. Once only one side has Clans left to activate, he may (one at a time) seek to roll for them, but the Command number for those Clan Leaders is treated as one lower than normal (representing that it is harder to coordinate a larger army).
Tuesday, November 10, 2015
Minimal Wargames terrain
So, at the recent Fall In convention, Chris and I hosted a game of The Sword and The Flame. The problem was that I didn't have much terrain with me.
I had brought my standard green drop cloth for the table (actually, I brought the two smaller ones, which are approx 6x6 each, as my larger one was on the Wargames table at home with a 28mm Balkanian battle on it).
I had my red pumice rocks (picked up outside a Hardee's restaurant in 1997 and still doing great duty).
I also had four bags of scrubby desert lichen.
I had also brought my home made African village huts.
At the convention I had purchased 8 feet of rail fencing.
With all that (which isn't much) I was able to put together a table that represented a decent tactical challenge for the players.
The fence was a movement obstacle for both sides.
The scrub (clumps of lichen) was a movement problem for the Anglo-Egyptian forces. It also provided cover for all troops. The Dervishes could move through unimpeded.
The rocks marked six scrub areas as potential ambush areas for some hidden natives.
Finally, the village represented the focal point of the scenario.
It wasn't elegant, but it didn't have to be - it still produced a terrific game, and it all fit in half a duffel bag along with three cases of troops.
Chuck
I had brought my standard green drop cloth for the table (actually, I brought the two smaller ones, which are approx 6x6 each, as my larger one was on the Wargames table at home with a 28mm Balkanian battle on it).
I had my red pumice rocks (picked up outside a Hardee's restaurant in 1997 and still doing great duty).
I also had four bags of scrubby desert lichen.
I had also brought my home made African village huts.
At the convention I had purchased 8 feet of rail fencing.
With all that (which isn't much) I was able to put together a table that represented a decent tactical challenge for the players.
The fence was a movement obstacle for both sides.
The scrub (clumps of lichen) was a movement problem for the Anglo-Egyptian forces. It also provided cover for all troops. The Dervishes could move through unimpeded.
The rocks marked six scrub areas as potential ambush areas for some hidden natives.
Finally, the village represented the focal point of the scenario.
 |
| The Table. Coffee is a bonus. |
It wasn't elegant, but it didn't have to be - it still produced a terrific game, and it all fit in half a duffel bag along with three cases of troops.
Chuck
Sunday, November 8, 2015
Gaming at Fall In
So, although the weekend was very busy with me attending to online business with my Graduate Students, in the evening on Friday and Saturday I got to participate in some fine wargames.
First, on Friday, I got to play in Patrick Berkebile's most excellent game of Regimental Fire & Fury. The scenario was the battle of the Wheatfield, during Gettysburg.
 I got to participate on the Union side, commanding the divisions of Zook and Cross. It was great fun, and the battle looked fantastic.
Patrick has been painting up the forces himself (in usual excellent manner) in 6mm. The battlefield was done as a battle mat (that Patrick made, painting the features on canvas, and then adding flocking and details), over a contour layer of styrofoam for hills and rises. Finally, all was pinned down for stability, and the trees were also pinned through the canvas into the styrofoam hills and foam layer under the map.
Other players included Gil Bates and Ralph Krebs on the Confederate side, and others. Patrick knew the rules (and the scenario) very well (a must if you are going to run a convention game), and it was a completely enjoyable experience, that Patrick kept moving along very nicely.
Then, on Saturday, the ODMS lads played a great old game of The Sword and the Flame! It was a Sudan scenario, with 14 units (and a gun) on the Dervish side, and 6 units (and a nordenfeldt) on the Anglo-Egyptian side. There is a great write up (with lots of pictures) over at the Old Dominion Military Society blog.
Lots of cool games, and I did make some minor purchases (I got Rebellion! - the American Revolutionary War supplement for Black Powder, as well as some terrain building items). A great convention - some extra pictures below.


First, on Friday, I got to play in Patrick Berkebile's most excellent game of Regimental Fire & Fury. The scenario was the battle of the Wheatfield, during Gettysburg.

 |
| Gettysburg: Into the Wheatfield (painting by Bradley Schmehl) |
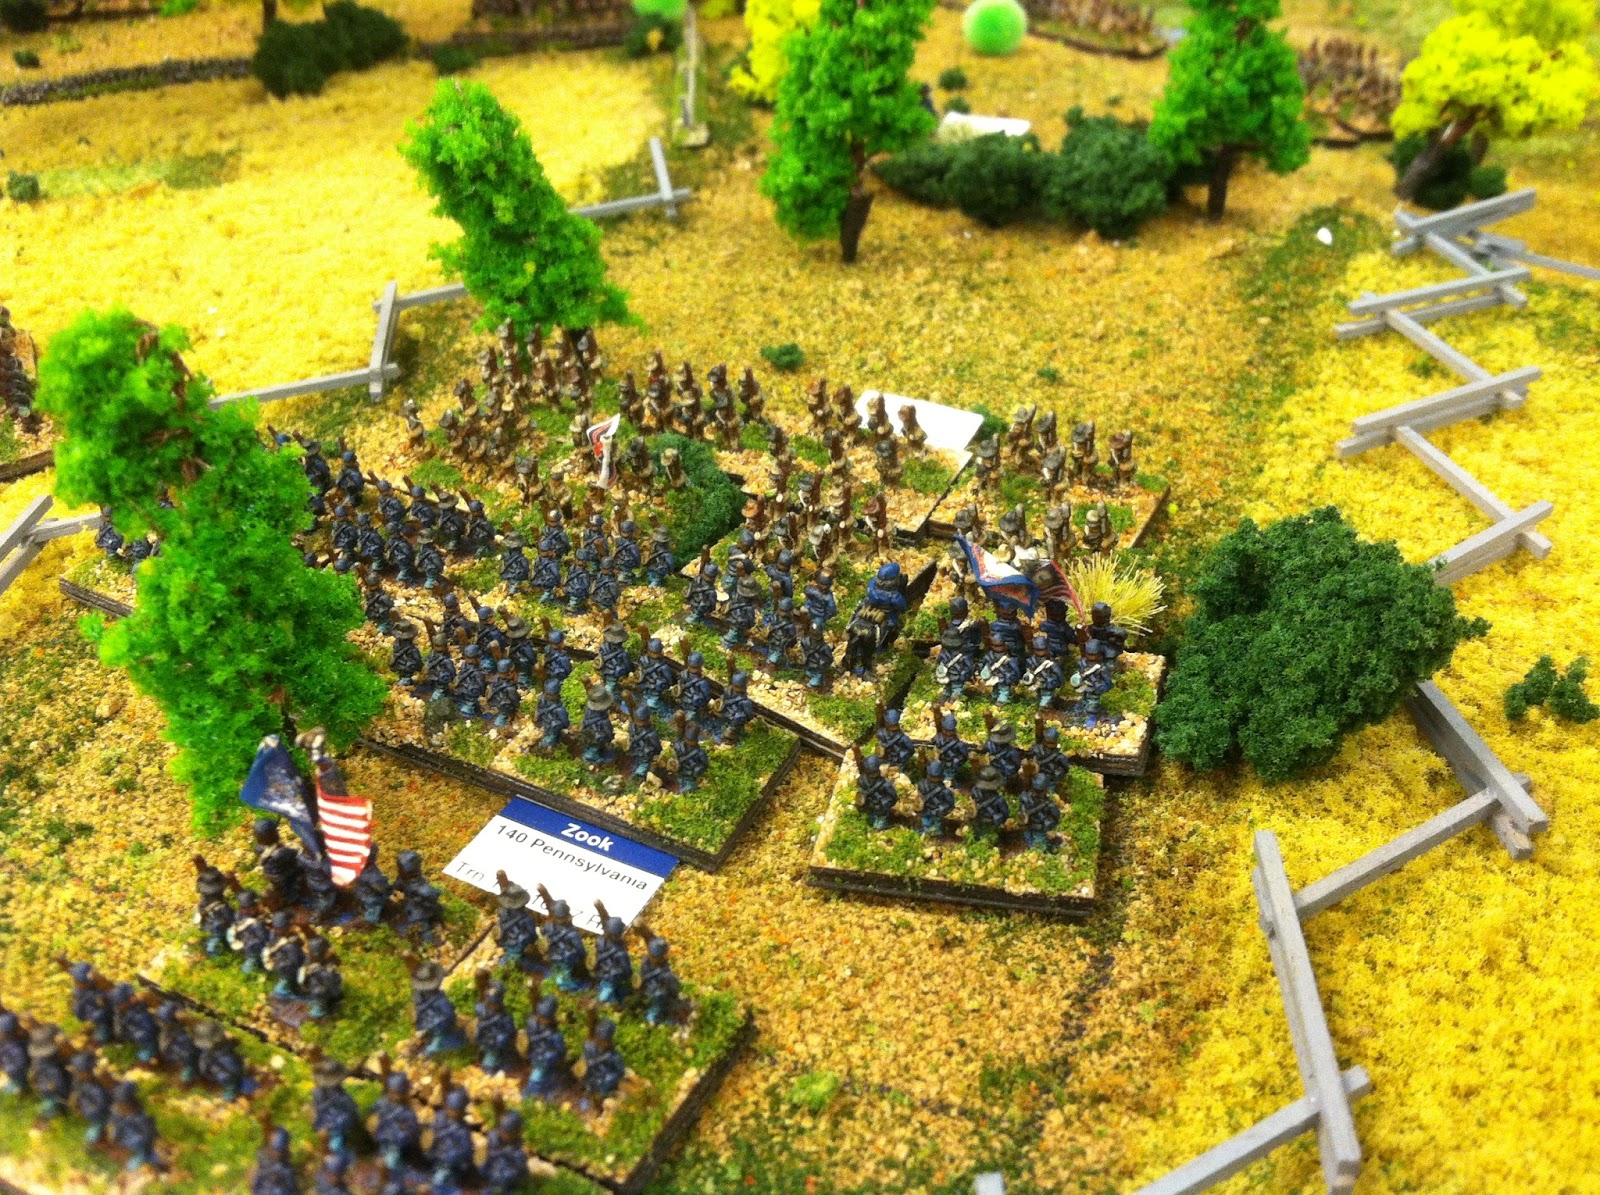 |
| A portion of Zook's division, encountering some Confederates, coming through the rough between the fields |
 |
| Bigelow's Artillery - also under my command |
 |
| Gil Bates - Confederate Commander |
 |
| Ralph Krebs, Confederate Commander (and far left, Mac, my ally) |
 |
| Zook's infantry, out of command and disordered |
 |
| Fighting in the wheatfields, and in the rough in between |
 |
| Assault up the hill! |
Other players included Gil Bates and Ralph Krebs on the Confederate side, and others. Patrick knew the rules (and the scenario) very well (a must if you are going to run a convention game), and it was a completely enjoyable experience, that Patrick kept moving along very nicely.
Then, on Saturday, the ODMS lads played a great old game of The Sword and the Flame! It was a Sudan scenario, with 14 units (and a gun) on the Dervish side, and 6 units (and a nordenfeldt) on the Anglo-Egyptian side. There is a great write up (with lots of pictures) over at the Old Dominion Military Society blog.
 |
| ODMS Lads engaging in fine shenanigans! |
Lots of cool games, and I did make some minor purchases (I got Rebellion! - the American Revolutionary War supplement for Black Powder, as well as some terrain building items). A great convention - some extra pictures below.


Tuesday, November 3, 2015
Heading to Fall In
Looking forward to seeing lots of new stuff.
Planning on playing (at least) some Hordes of the Things, and also hosting a game of The Sword and the Flame.
 |
| An older game of TSATF |
I hope to see some SAGA, Lion Rampant and maybe some Tomahawk and Musket.
 |
| 6 player HOTT from 2009 |
Shopping for rules, and maybe some terrain bits. Probably no new figures. Probably.
Look forward to pictures this weekend.
Thursday, October 29, 2015
Naval Wargaming article - over at ODMS blog
In anticipation of the upcoming Williamsburg Muster, which as War at Sea: Wargaming Naval History as it's theme, there is an article about Naval Wargaming (with lots of links to rules, some free, and some otherwise) over at the ODMS blog.
Some additional Naval Wargaming resources -
Naval Wargames Society (lots of free rules)
Interesting History of Naval Wargaming
History of Naval Wargames mostly as used by the USN
Wargaming at the US Navy Staff College
Archived Victory at Sea resource page.
A scan of the (long out of print, since 1975) rules, Don't Give Up The Ship
 | |
| 1975 Sailing Ship rules from Gygax, Arneson & Carr |
Wednesday, October 28, 2015
19th Century Imagi-nations - Terrain for the 23 Weeks War pt 1
In 1871, when the 23 weeks war began, the forces of Furstenberg invaded the Cantons of Rumpwhistle, and began operations around Lake Nyakker. The first land engagement was between the three Companies (in name only, they are close to battalion strength, of about 600 men each) of the Furstenberg Seebataillone fighting Fribourg canton militia at the battle of Krump's Farm.
One of the recent model farm houses that I built was based on the farm house of this engagement. The other key terrain features of the battle are (1) the old oak forest, and (2) the Persimmon grove at Krump's Farm.
The farm house is as constructed, recently. It will be based on a base with a wall around the farm yard, and a work building in the back yard. The base I am working on (I will post photos) will have a rough, but ruined, outline of the house, that the actual model house sits on. This allows for the possibility of Krump's farm house to be destroyed by artillery or fire during the battle.
The Persimmon grove will be modeled by using several rows of smaller 15mm trees, representing the grove, with the stone wall around it. This allows for the fight in and around the grove, and should be pretty flexible.
The edge of the old Oak forest, that also saw action, will be modeled using larger 28mm trees, grouped together on dark felt to show the forest outline.
Pictures will be posted soon, but here is a map of the battlefield...
 The map is approximately 6' wide by 4' from north to south. The features, labeled, are these:
The Furstenberg Light Brigade (consisting of three battalion strength units of Seebataillone, and a battery of light guns from the Eiderduck) had landed by ships boats on the north shore of Lake Nyakker, and enter this map from the south side, between the southwestern leg of the Chewgas, and the southwest corner of the table.
The Fribourg Canton militia are in place, with one battalion stationed east of the bridge, on the road between the two farms, and two battalions in the ground between Krump's Farm and the Chewgas stream. Finally, two units of Rumpwhistle sharpshooters will enter the road, in the northwest corner of the board.
The battle is simple - the Furstenberg troops must cross the Chewgas, and the Rumpwhistle militia must do their best to stop them.
 | |
| The border between Furstenberg and Rumpwhistle runs through the Karzstan Mts |
One of the recent model farm houses that I built was based on the farm house of this engagement. The other key terrain features of the battle are (1) the old oak forest, and (2) the Persimmon grove at Krump's Farm.
The farm house is as constructed, recently. It will be based on a base with a wall around the farm yard, and a work building in the back yard. The base I am working on (I will post photos) will have a rough, but ruined, outline of the house, that the actual model house sits on. This allows for the possibility of Krump's farm house to be destroyed by artillery or fire during the battle.
The Persimmon grove will be modeled by using several rows of smaller 15mm trees, representing the grove, with the stone wall around it. This allows for the fight in and around the grove, and should be pretty flexible.
The edge of the old Oak forest, that also saw action, will be modeled using larger 28mm trees, grouped together on dark felt to show the forest outline.
Pictures will be posted soon, but here is a map of the battlefield...

- A. Krump's Farm, with a stone wall around it.
- B. The Persimmon Grove, also with a wall around it.
- C. The Chewgas Stream, that runs south east to the Maduro River, and south west to Lake Nyakker. It is deep and fast, not fordable, but not very wide (about 2" in game scale).
- D. Hedge rows, tall enough for a man to hide behind (soft cover - concealing, but not protective)
- E. Two other farms along the road into the Maduro Valley
The Furstenberg Light Brigade (consisting of three battalion strength units of Seebataillone, and a battery of light guns from the Eiderduck) had landed by ships boats on the north shore of Lake Nyakker, and enter this map from the south side, between the southwestern leg of the Chewgas, and the southwest corner of the table.
The Fribourg Canton militia are in place, with one battalion stationed east of the bridge, on the road between the two farms, and two battalions in the ground between Krump's Farm and the Chewgas stream. Finally, two units of Rumpwhistle sharpshooters will enter the road, in the northwest corner of the board.
The battle is simple - the Furstenberg troops must cross the Chewgas, and the Rumpwhistle militia must do their best to stop them.
Subscribe to:
Posts (Atom)