Wednesday, November 30, 2016

The Wargaming Profession

There is indeed a professional side to hobby wargaming.  Designers, editors, and publishers of wargames are definitely all talented individuals.  But there is another side to professional wargaming, and that is wargaming for the Department of Defense (in whatever country you live - for me it is the U.S.).  And they are desperate for fresh talent and more talent.  Here is a very good article, about someone I know (and participated in a professional wargaming design session with, just a month ago).  A good article, read it even if you aren't interested in the profession, it is eye opening.

Wargaming Needs New Recruits

Tuesday, November 29, 2016

The Thanksgiving That Was

Thanksgiving was celebrated with great joy and thankfulness at GwCHQ (i.e. - our family home).  We had plenty of feasting, and a good friend spent the weekend with us (rather than at home, alone) and we had a parcel of other friends join us on Saturday for a game day.  There was supposed to be (perhaps) an RPG session - never happened.  There was supposed to be some miniatures gaming (Frostgrave, Chainmail, and maybe Lion Rampant) - also never happened.  Did that pose a problem?  No, we had a great time anyway!

The guy in the hat kept asking about King of Tokyo

We played a number of board games over the weekend (standard fare - Dominion, Catan, Lanterns, Ticket to Ride, etc), and we played a bunch of Legends of Andor.  Fun game, and it really scratched that "we would like to play an RPG but can't get the whole band together" sort of desire to go adventuring, fight monsters, and complete quests.  I don't know what the German version of the game is like (published by Kosmos), but the version we have (the Fantasy Flight English version from 2012) was fantastic.  One of the best things about the game was that artist Michael Menzel (who paints really stunning maps and images used in a lot of boardgames) was also the game designer.

Board showing the above ground map of Andor (reverse shows below ground)

The basic mechanic is one of using time slices to perform tasks (usually movement and combat against monsters).  This is very similar to the mechanic used in a lot of other games, but immediately Tinner's Trail and (to a lesser extent) Thebes spring to mind.  Also, the many Kramer boardgames that use action points to limit your moves.  But in the other examples, and in Legends of Andor, everyone is doing their actions interspersed, instead of the whole pool of action points all at one time.  Very clever, really gives a feel for doing your actions during a day of adventuring, and it makes the game flow well, and introduce some nice decision making for the players.

To end this recap on gaming over Thanksgiving, I thought I would share a few other game boards that were painted by the talented Mr. Menzel.  Below are boards for Pillars of the Earth, Stone Age, and Castle for all Seasons.  Other than each of them being stunningly beautiful abstract landscapes (showing the country side, and other features important for the game, but illustrating scenes of local activity and inhabitants, albeit out of scale to the countryside), are all also very informative and intuitive in indicating play areas, and active spots, on the board/map.

Pillars of the Earth


Stone Age

A Castle for All Seasons

So it was a lovely Thanksgiving - with Family, Feasting, Friends, and a bit of Faith.  The year has been very good to us, and we had a great time forgetting about our toils and jobs and school and cares for a while, and enjoying each others company over a gaming table (also, plenty of pie and coffee helped).  Now, on to Christmas!

Sunday, November 20, 2016

Lord of the Manor - Sinews of War

(This is a continuation of my thoughts about a mapless Medieval campaign supporting tactical medieval rules, such as Chainmail.  This is the first version of the random generation of lands and troops.)

There is thy gold, worse poison to men's souls,
Doing more murder in this loathsome world,
Than these poor compounds that thou mayst not sell.
                          - William Shakespeare, Romeo & Juliet

Several things are still left to do, in order to complete the Lord of the Manor medieval campaign rules.  At a minimum, these include rules for conducting campaign battles (what is at stake, terrain selection, etc.), their outcome, and how to spend the bezants that accrue to a player, as part of their demesne.  In addition, I think that a section on random characteristics (one each) that make a demesne unique, would be interesting.  This article, however, is about the many uses to which a Lord of a Manor could put the accumulated bezants of that domain.

A Lord may find himself in possession of a certain number of bezants, which he may wish to spend, in order to make his military ventures more likely to succeed.  This may include several things that are listed below, but in general include hiring more men, investing in armaments, the hire of mercenaries, and perhaps securing a marriage for an heir.


More Men
Hiring more men is quite easy to do.  Simply choose a unit that is already in the demesne army, and pay the amount indicated to add more figures to the unit.

  • Foot unit then the cost is 100 bezants to add an additional 6 men to the unit
  • Billmen can have 6 crossbow added to their unit for 200 bezants
  • Mounted unit, then the cost is 200 bezants to add an additional 3 men to the unit

Each unit can have this done a maximum of one time only (i.e. - Billmen can have 6 additional men, or 6 crossbow, but not both).  The additional money can be spent to upgrade mercenary units, as well.


Mercenaries
Mercenaries can be hired, both domestic and foreign (foreign mercenaries only available to a Demesne that has a Port).  In both cases, they will return at the end of the campaign season they have been hired for.

Domestic Mercenaries
TypeCostClass
Villeins100bz18x light infantry,
mixed weapons (sword, axe, spear)
Routiers 200bz18x heavy infantry
Town Levy 200bz18x light infantry, pike, act as Levy
Yeomanry200bz12x English Longbow, light infantry
with archer stakes
Catapult Troupe 200bz4x crew, light catapult

Note that the demesne does not have to have a Town as part of its lands, in order to hire Town Levy.

Foreign Mercenaries
TypeCostClass
Swiss Pike300bz18x light infantry, pike
Landsknecht200bz18x heavy infantry, polearm
Burgundian
Arbalaster
200bz12x light infantry,
heavy crossbow
Hansa Billmen100bz18x light infantry, polearm
Catalan Scouts100bz12x light infantry, javelin
Aragon Jinetes200bz9x light horse, javelin

Note, as mentioned above, in order to hire Foreign Mercenaries, the demesne must have a Port as part of its lands.


Armaments 
Money can be spent to upgrade the equipment of some units.  Each option below can only be applied to a unit once, although a unit may benefit from several options.  For example, a single Archer unit (12 figures, light infantry, Longbow) may be made into Armored Archers (Heavy Infantry), and given Archer Stakes.  Or a Sergeant unit may be upgraded with Lances, and being made into Knights (Heavy Horse).
  • Spearmen (Heavy Infantry), can be made into Billmen (Polearms) for 100bz.
  • Archers can be made into Armored Archers (Heavy Infantry, Longbow) for 100bz.
  • Archers can be given Archer Stakes, for 100bz.
  • A unit of Foot Men At Arms (Armored Infantry) can become a unit of Mounted Men At Arms (9 figures, Heavy Horse) for 200bz.
  • Billmen (Heavy Infantry) can be given plate armor (Armored Infantry) for 100bz.
  • Crossbow troops can be given Pavise, for 100bz.
  • A Light Catapult mercenary troupe can be upgraded to a Heavy Catapult for 100bz.
  • Sergeants or Mounted Men At Arms can be given Lance, for 100bz.
  • Sergeants (Medium Horse) can be upgraded to Knights (Heavy Horse) for 100bz.


Dynasty
A Lord may decide to secure a good marriage for his heir (either son or daughter), which may come with gifts of additional lands to the demesne.  A Lord may only benefit from this, once.  The Lord decides whether to invest in a Marriage (300bz) or a Diplomatic Marriage (500bz).

Marriage (300bz) - The Lord receives as a gift, a parcel of land.  Roll on the table to determine a new land to be added to the demesne.  The normal scutage for the lands - troops and/or money - will accrue as normal.

Diplomatic Marriage (500bz) - The Lord receives as a gift, his choice of a parcel of land.  Roll on the table twice, to determine two different lands to choose from (re-roll a double result)  The Lord chooses from among the two lands, and it is added to his demesne, as above.

In either case, the Lord now has secured an Alliance.  In the future, he may call for allied troops for any fight.  He will have to pay for the troops, but he gets the two following options.  Note that these are not mercenaries, and will behave as normal troops that are part of the army, but for one battle only. 
  • 100bz - Crossbow (12 figures, light infantry, Crossbow)
  • 200bz - Knights (9 figures, heavy horse, lance)
Note that the Lord may choose to hire one, or both, of these units. Also, they do not start on the battlefield with his regular army, but may arrive at anytime on turns 2,3, or 4.  The Lord makes a note before the game start whether they will arrive on his left or right flank, and what turn they will arrive.  They appear on the edge of the battlefield (within 6" of the center line), at the noted turn (the Lord should reveal his note to his opponent at this time), during the Lord's movement phase.  They may move normally next turn.


Thursday, November 17, 2016

Koenig Krieg - review

This is another review in the Once and Future Rules series, of wargame rules that are out of print, but that got a lot of play at one time (at least, in the clubs and groups I played in since the early 1980s).

This review is a little bit different from some of the others, in that KK is a ruleset that is currently available, so it is not out of print (a great review by Mark Severin at Deep Fried Happy Mice makes a good read).  It is, however, in a very different format from the wonderful set by Barry Gray that I bought back in the mid 80s for about $3 or 4.


The version I have, (actually I have two versions, the one from 1982, and the one from 1986) does not have much information in it, as to publishing info, etc.  There is a cover page that mentions Barry Gray by name, and inside the back cover, there is an advert for Mike's Models. The advert mentions Austrians and Prussians, and offers them at $4.50 for 18 figures (or 9 cavalry).  The good old days.

Admittedly, in the 1980s, I was not too interested in the Seven Years War in Europe, but I was interested in the North American portion (the French and Indian War), and also the American War for Independence.  It was with that in mind that I first approached the rules.  Later I would become a fan of Seven Years War era warfare, in Europe, and learning more of the history went arm-in-arm with the wargaming.


So what is KK like?  First, it uses rectangle elements for basing the infantry, with 4 figures on a base, 2 each in 2 different ranks.  Other than Johnny Reb, from Adventure Gaming, I do not recall other rule sets using similar basing at that time (that would all change, with the advent of Napoleon's Battles...).  Cavalry and Artillery were mounted much like many other rulesets.  But it wasn't the basing that made (and still makes) KK a good ruleset.  It was the turn sequence.


The turn sequence has five phases in it, which the players execute through in order, and roughly simultaneously, each turn.  I say roughly simultaneously, because while each side will do their part of a phase before progressing to the next, within each phase where order matters, the two sides will determine initiative through an initiative test.  Here are the phases:

Command Phase
Movement/Fire Phase
Close Combat Phase
Melee Phase
Exploitation Phase

Going through these is a great way to explain KK.

The Command phase 
This is when you check to see which units will be "in command" or "out of command" during the turn.  Any units out of command will have to dice to see if they can act during the other phases - Infantry will only act on a 1-2 (on a d6), and Cavalry (being more independent?) can act on a 1-4.  Out of command units can always fire, but cannot change formation or facing (even if it can move)

The Movement/Fire Phase 
This is when units (you guessed it) move and fire.  This is done by alternating Brigades.  The Phase starts with determining Initiative.  The player with initiative activates the units within a brigade, then it passes to the other player, etc.


Now is a good time to bring up Operations (OP).  Each type of unit has a number of operations that it can use during each of the Three Main Phases (Move/Fire, Close Combat, and Exploitation).  If a unit is Moving, it simply decides how many of its OP for this phase to put towards movement. Each one generates 4" of movement.  An OP also allows for a formation change, or a backstep (of 1").  Cavalry, of course, have more operations than Infantry, especially in the Move/Fire phase, so can move further.  Depending on current formation, etc, some units have a +1" modifier, that they might use to add to the total move they will get (for instance, Foot Artillery has 1 OP in the Move/Fire Phase, but it also has +1" - so whatever else it does, it can also move a bonus of 1";  Horse Artillery is the same, but with 2 operation points, and +1"; etc.).


Firing also uses an OP.  So, Infantry in Line, has 1 OP in the Move/Fire phase.  That means it can move 4", or it can Fire.  It cannot do both. This is what gives the game it's very nice feel for Linear Warfare of this period.  You can extend a unit out by moving it away from it's friends, but it won't be able to do much, quickly, on it's own - so you better be supported.

Special Rules for strategic moves for units well away from the front exist, as well as rules for retreat moves (which don't require an operation point).

Firing is done during this phase, and is adjudicated by determining the number of dice per figure (roughly, 1 dice per two infantry firing; or 1 dice per artillery crew firing).  The chance to hit (on each d6 rolled) is based on a Fire Table, and is typically a 5+ or a 6, but in some cases can be as generous as a 3+ or 4+.


Losses are marked with casualty caps, and when a stand has accumulated enough, it is removed from the unit.

So to recap, the available OP a unit has in the Move/Fire phase can be used in the following way:
  • Move 4" (except Infantry in Square)
  • Change facing/formation
  • Fire (except cavalry)
  • Backstep 1"
All very reasonable, which is suitable for warfare in this Age of Reason.

The Close Combat Phase 
The next phase is the Close Combat phase, which allows for charges, in certain situations, that will result in melee combats.   Again, the phase starts with determining Initiative. Then alternate Brigades.


Units that are within 2" of the enemy may activate during this phase.  Again, each unit has a certain number of OP.  The allowable ways to spend OP in this phase are as follows;
  • Skirmishers (only) can move 4"
  • Any unit may Change Formation or Facing
  • Infantry can charge an enemy within 1"
  • Cavalry can charge an enemy within 2"
  • Infantry and Artillery can fire at a unit charging them
  • Cavalry can counter-charge a unit charging them.
Each of these costs 1 OP.


The Melee Phase
The next phase is to determine the outcome of Melee Combats that resulted from charges and contacts made in the previous phase.

Melee combat is done by adding a dice roll to the morale of the unit involved.  This produces a melee total for that side.  Then both sides are compared, and the lower total loses the difference in casualties.  If there are multiple units involved, then the average morale is used, but each unit gets to roll a dice to add to the total.  There are, of course, situational modifiers.  The losing side then retreats, and if the winner was the unit that charged, the loser loses another figure.  If the melee totals were a tie, then both sides lose a figure, and all units involved have to make a morale check.  Losers will retreat, if both pass, then fight another round.


The Exploitation Phase
Units that charged, and won a combat, may now execute OP during the Exploitation Phase.  This begins, again, with testing initiative, and then alternates, one brigade at a time.  Of course, only the brigades that have units doing an Exploitation can move this phase.  Infantry and Artillery may fire, even if they did not earn an Exploitation move.  So the actions allowed for OP to be spent on in this phase are:
  • Move 4" per OP (exploiting units only)
  • Change facing or Change formation (exploiting units only)
  • Infantry and Artillery can fire at a unit charging it
  • Cavalry can counter-charge a unit charging them
In this way, a successful charge in the Close Combat Phase, that is resolved successfully in the Melee Phase, can result in an Exploitation Move that generates another combat.  There is a chance for Cavalry to become unhinged (er. uncontrolled - sorry, my infantry bias is showing through).  If so, they begin a charge to glory that might take them off the board, or might take them through any enemy units in the way.

There are some rules for morale, army morale, and some optional rules (weather, dragoons, etc).  The beginning of the book has a good section on setting up a table, basing figures, and organizing brigades.  Finally, an appendix has great information on army contents, and information on building armies (how many units, what types, ratio of guns to infantry, etc).


A great set of rules - always fun to play, represents the combat of the time nicely, plays quickly, and has an easy set of rule systems.  As I mentioned I played these first with AWI armies, so we didn't have a lot of cavalry - which really cuts down on things like exploitation and charges, and focuses on fire combat.  So when I first played a large Seven Years War battle, it was like *Something Wonderful* had occurred, and the game took on a whole new dimension.  And it never even required me to get some sort of thing about flutes.


KK is fun, and I still like it.  It, to me, was always much more fun to play than Warfare in the Age of Reason, but maybe a bit less specific.  I'll take fun over specific. 

Sunday, November 13, 2016

Current Projects - Autumn Gaming

This Autumn has been a great time, and a tough time, from the perspective of my hobby. I have had lots of time to spend writing reviews and working on articles and rules, and also some painting activities, but I haven't gamed since September, and had to miss Fall In.  Here is a rundown on the projects I have been working on...


I have been keeping up my research and work on the Once and Future Rules project, with upcoming reviews on Koenig Krieg and Angriffe, and some more ECW rules (Protz and 1644). Many others on the stack.

Writing an article that reviews and compares three different board games on the American Revolutionary War.

Finishing up my campaign rules (Lord of the Manor) for Chainmail. This was instigated by my recent review series.

Finishing up a set of Viking age skirmish rules ("By the Runes!").

Not much with RPGs right now.

Planning some Thanksgiving Weekend gaming (Frostgrave, Lion Rampant, and board games).

On the painting table, some things have been happening...

About two-thirds done with reorganizing and re-basing a large (2000+ figures) 15mm High Medieval collection.

Re-basing some Renaissance 15mm figures.

Reorganizing my AWI figures (maybe on hold for now...)

Building 15mm stone walls. Also planning to paint some Baueda 15mm wattle walls.

Painting some buildings (finishing desert buildings in 15mm, and starting some half timbered medieval buildings).

Prepping some 28mm medieval figures (from my dormant WotR project, now un-dormant).

Sorting out some crossbow figures in 15mm that can be either late Medieval, or Italian wars.  This will probably be my next 15mm paint project.

Saturday, November 12, 2016

Lord of the Manor - Sample Army - Bombastia

(This is a continuation of my thoughts about a mapless Medieval campaign supporting tactical medieval rules, such as Chainmail.  This is the first version of the random generation of lands and troops.)

This is a partner article to the one on the army of Poppenheim.   As mentioned previously, Bombastia is the other medieval state that was part of pre-modern Furstenberg. It was often at war with Poppenheim, even into the early modern period, when the 1696 Crisis of the Pumpkin-King Throne between the Principality of Bombastia and the Grand Duchy of Poppenheim would lead to the Unification Wars of Furstenberg (ending up establishing the modern state of Furstenberg).  But, as early as the 11th century, and on up until the 18th, the two states were often at war with each other.
So, relying on the Lord of the Manor system, lets take a look at what the medieval state of Bombastia looked like, and what the army looked like.

First, the chief Manor of Bombastia is at Hofbrau Burg, and the ancestral feudal duty of the Hofbrauen means that the army of Bombastia starts out with a unit of Knights and a unit of Crossbow.
Hofbrau Berg

The other lands that make up the Demesne of Bombastia are as follows:

  • Four farmlands, which the player chooses to provide 3 Spearman units, and 1 unit of mounted Sergeants.
  • Two forests, which the player chooses to provide 2 units of Archers.
  • One town, which provides 1 unit of Billmen, and 100 bezants.
  • One Church, which the player decides to tithe 100 bezants, and gains the use of 1 unit of Holy Order Knights.
  • Two Highlands, which the player chooses to provide 1 unit of Highland Pike, and 1 unit of Reivers.
  • One Orchard, which provides the player with 1 unit of Men at Arms, and 100 bezants.

This means that the army of the Demesne of Bombastia consists of:

1 unit of Knights (9 figures, heavy horse, lance)
1 unit of Holy Order Knights (9 figures, heavy horse, lance)
1 unit of Sergeants (9 figures, medium horse)
1 unit of Reivers (9 figures, medium horse, lance)
3 units of Spearmen (18 figures, heavy foot)
1 unit of Billmen (18 figures, heavy foot, polearms)
1 unit of Men at Arms (18 figures, armored foot)
1 unit of Highland Pike (18 figures, light infantry, pike)
2 units of Archers (12 figures, light infantry, long bow)
1 unit of Crossbowmen (18 figures, light infantry, crossbow)

And the player has access to 200 bezants, but spends 100 of it to secure the unit of Holy Order Knights, from the local Church.

This is a very good army, but the player might be eager to either conquer the Towns or the Port that the Poppenheim player has, to balance out the money situation - very lopsided, at 600 bezants (Poppenheim) to only 200 bezants (Bombastia).

Lord of the Manor - Sample Army - Poppenheim

(This is a continuation of my thoughts about a mapless Medieval campaign supporting tactical medieval rules, such as Chainmail.  This is the first version of the random generation of lands and troops.)

In the past, some of my wargaming with Imaginary Nations (or Imagi-Nations) has featured a number of substates and states in a fictional region called Balkania.  In 19th and 20th century conflicts, I have used the two states of Furstenberg and Rumpwhistle.  Earlier conflicts have been between the two medieval states of Poppenheim and Bombastia (they were baronial lands that became part of Furstenberg).

Here is the treatment that a medieval Poppenheim receives, when using the Lord of the Manor method to determine the army.


 So, the demesne of Poppenheim has 12 lands. The first is automatic (a Manor), the other 11 were generated using the dice method presented in the earlier article.

First is the Manor, which we will call Schloss Romfels, and is the seat of Poppenheim power. It provides two units to the army, a unit of Crossbowmen, and a unit of Knights.

Schloss Romfels

  • Three Farmlands, which the player chooses to provide 2 units of Spearmen, and 1 unit of mounted Sergeants.
  • One Forest, which the player chooses to provide one unit of Archers
  • One Pasture, which the player chooses to provide one unit of Slingers, and 100 bezants.
  • Two Towns, which provides 2 units of Billmen, and 200 bezants.
  • One Port, which provides 200 bezants, and access to hire Foreign Mercenaries.
  • Two Highlands, which the player chooses to be 2 units of Highland Pike units.
  • One Fish Pond, which provide 1 unit of mounted Men at Arms, and 100 bezants.
 This gives a family consisting of:

1 unit of Knights (9 figures, heavy horse, lance)
1 unit of mounted Men at Arms (9 figures, heavy horse)
1 unit of mounted Sergeants (9 figures, medium horse)
2 units of Spearmen (each, 18 figures, heavy infantry)
2 units of Billmen (each, 18 figures, heavy infantry, polearms)
2 units of Highland Pike (each, 18 figures, light infantry, pike)
1 unit of Archers (12 figures, light infantry, longbow)
1 unit of Slingers (12 figures, light infantry, sling)
1 unit of Crossbowmen (18 figures, light infantry, crossbow)

And the player has access to 600 bezants, and has access to hiring Foreign Mercenaries.

This is a very interesting army, and should provide a lot of interest to the player who is commanding it.  There is a lot of strong infantry, although the Highland Pike are going to be tough to manage (they hit very hard, and might be a terror, if the enemy army lacks any pike units - but they are light infantry, and would be susceptible to flank attack, and archery).

Friday, November 11, 2016

Lord of the Manor - Lands and Troops

(This is a continuation of my thoughts about a mapless Medieval campaign supporting tactical medieval rules, such as Chainmail.  This is the first version of the random generation of lands and troops.)

The Player represents the Lord of a Manor, which owns a Demesne.  At the center, of course, is his Manor, or Castle.  This provides two military units, A unit of Crossbows (light infantry, 18 figures, crossbow), and a unit of Knights (heavy horse, 9 figures, with lance).

So, if we go with this chart for the random determination of lands:

 2 - Vineyard
 3 - Port
 4 - Town
 5 - Freeland
 6 - Forest
 7 - Farm
 8 - Pasture
 9 - Church
10 - Highlands
11 - Fish Ponds
12 - Orchards

Then the next step is to determine what a Lord will receive for his feudal escheats from each of those types of land.

Vineyard - Lands with grape vines, plus wine presses, cellars, and a local population of workers to draw from.  The wine is a valuable trade item, so this land produces not only feudal soldiers (heavy infantry) but also money, from the wine trade.  Provides a unit of Spearmen (heavy infantry, 18 figures), and 100 bezants.

Port - This land is along a navigable river, and a trading town has been built up at the spot of a natural mooring spot on the river.  Some money is produced from the trade port, but more importantly, the ability to hire foreign mercenaries is possible, due to the amount of seagoing traffic that comes through here.  Provides 200 bezants.  May hire foreign mercenaries.


Town - A sizeable independent town has grown up here, meaning that it supports not only a sizeable market (large enough to service the town, but also the surrounding lands and villages), but also a church, guildhalls, mills and other urban services.  The feudal obligation of the town is met through providing troops drawn from the town population, and the marketplace generates a regular flow of tax money.  Provides a unit of Billmen (heavy infantry, 18 figures, polearms), and 100 bezants.


Farm - This is not just a single farm, but farmland representing multiple hides worth of feudal farms and subtenants.  The feudal obligation of all these farms and villages is met in the form of heavy infantry, but also the natural horsemanship of the population means that some mounted soldiers can be classed as sergeants.  Provides either Spearmen (heavy infantry, 18 figures), or Sergeants (medium horse, 9 figures).


Forest - Representing the waste of the demesne, the woodlands provide the serfs with the means of producing charcoal, harvesting firewood, and hunting for small game.  Of course, there are enough villeins and scoundrels lurking along forest roads that a ready supply of archers can be conscripted.  Depending on the area around the forest, it is also possible that some mounted archers can be found, and could be formed into units of hobilars.  Provides either Archers (light infantry, 12 figures, longbow), or Hobilars (medium horse, 9 figures, bow).


Pasture - This represents closed lands for the Lord's private flocks of animals.  Open land is found in the farm lands for the serfs to graze their own animals, this is representing husbandry of animals on a large scale.  Local villages supporting the economy of shepherds and drovers will produce feudal troops suitable for light cavalry duty, or as slingers.  There is also some money to be made from the wool trade.  Provides either Slingers (light infantry, 12 figures, sling), or Riders (light horse, 9 figures), and 100 bezants.


Highlands - These lands are in hills and mountains with terrain typically too rough for large scale farming or grazing.  The locals are rough independent clans and tribes, that owe fealty but may not provide much for the manor other than occasional military service.  The troops are irregular bands that are useful for scouting and skirmishing, best described as light infantry or mounted raiders.  Provides Highland Infantry (light infantry, 18 figures, Pike; or 12 figures, Bow), or Reivers (medium horse, 9 figures, lance).


Orchards - Lands given over to long term agricultural produce, such as fruit and nut trees.  Typically such lands are a sign of a successful Manor, and so the presence indicates that there will likely be more money to provide armored and trained infantry, such as men-at-arms.  Provides one unit of Men at Arms (Armored Foot, 18 figures), and 100 bezants.


Fish Ponds - The lands of the Lord of the Manor are all his, including all wild produce (salmon from the rivers, deer from the forests, and so forth).  In order to increase the amount of fish that a Manor produces, fish ponds would be instituted.  Again, this represents a wealthy and vibrant Manor, which would attract scutage from wealthy families aligning themselves with the Lord - such families would produce heavy cavalry, if not knights, so are represented as mounted Men at Arms.  Provides one unit of mounted Men at Arms (Heavy Horse, 9 figures), and 100 bezants.


Church -A Manor would typically have several churches on it.  This would include at least one Chapel in the castle and perhaps a small church in each of the peasant villages, towns, and ports.  But when this result is indicated, it means that there is a higher status Church on the lands of the Manor.  These lands, while included within the demesne of the Manor, are actually independent. However, they might have the Knights of a devoted and powerful patron on call for feudal duty, or there might be a chapter house associated with the Church from a religious order of Knights (such as the Templars).  The presence of a Church, therefore, allocates to the Lord of the Manor the use of a unit of Holy Order Knights.  Provides one unit of Religious Order Knights (heavy horse, 9 figures, lance - treat as Religious Order), but only if Church is paid 100 bezants.


Money raised from Lands in the Demesne can be used to purchase extra equipment, to hire mercenaries, to pay for Scouts or Spies, to fund Adventures, and of course to tithe to the Church, in order to secure the services of Holy Order Knights.  Details on these will be in a future article.

A sample army, for Medieval Poppenheim, is detailed here.
A sample army, for Medieval Bombastia, is detailed here.

Wednesday, November 2, 2016

Overwatch - review

This is another review in the Once and Future Rules series, of wargame rules that are out of print, but that got a lot of play at one time (at least, in the clubs and groups I played in since the early 1980s).

We have severely underestimated the Russians, the extent of the country and the treachery of the climate.  This is the revenge of reality.
                   -Heinz Guderian

Overwatch was a rule set that was really very popular with the gaming crowd that played at the Campaign Headquarters store on the Virginia Peninsula (the parent store was in Norfolk, but I played at the store that was originally located in Hampton, and later in Newport News, much more frequently).


The crew at the store had originally gotten a copy of the 1979 playtest edition of the rules, which they almost immediately migrated to (previously playing a mix of Tractics and Angriffe).  But, the version I own, and the one I played mostly, was the second edition that came out in 1984.

These rules, written by Robert Davison, were written with 1/285 (or 1/300) scale miniatures (micro-armor) in mind.  The two earlier sets (Tractics and Angriffe) were written for HO scale miniatures, but could be adapted to micro-armor.  The ground scale is fifty yards to the inch, and the time scale is a minute to a turn.  For our games, which were tank heavy (as the rules tend to also be written for), and extremely tactical (not a lot of off-table assets, and not a lot of off-table maneuver), these rules were perfect for the games we were playing.  Davison chose to focus the rules on the period of 1943-45, which also suited us in our games (many of which were in the terrible latter years of the Eastern Front, as well as during the American campaigns in Italy and France).

The turn sequence is a non-simultaneous turn sequence, which works very well, although fire combat execution is done so as to mimic simultaneous action.  The turn is broken up into six phases, although I recall that once we were playing frequently, there was a tendency to slip phases 3/4 and 5/6 together, which is (as I recall) a big mistake and leads to weird outcomes.

  1. Move Sequence Determination - dice roll to see who moves first (this is not a choice; if you roll high, you go first)
  2. Movement Execution - both sides move, based on the order determined earlier, side A then side B
  3. Target Acquisition and Fire Designation - Using the target designation rules, determine who CAN shoot, and from those, both sides (again, side A first) will announce fire intentions.  This cannot be altered.
  4. Fire Execution - All declared shots from the previous phase are not executed.  If you didn't declare a shot, you can't take one now.
  5. Reaction Fire Designation - If you did not have a shot declared in phase 3, you could now declare a target.  It is possible, that because of weapons fire, you could see targets now, that you couldn't acquire before.
  6. Reaction Fire Execution - All fire designated in phase 5 is now executed.
When followed, this leads to pretty good results.  When players get sloppy, and start declaring and executing, all in one swoop, or even before the other player declares, then it gets fuzzy, and the old enemy of simultaneous movement rears it's head here - the argument about "I would have done that, but now I'm going to do this instead". . .

The rules cover a definition of how movement is handled (it is pretty straightforward and sensible).  Infantry, in a game with 1 minute turns, and 1 inch to 50 yards, does not move fast (1 inch per turn).   But, for our games, this hardly mattered, as we didn't do too much in Overwatch games with infantry, other than crew served weapons (gotta have those AT guns out there, you know).

Other rules covered are all the rules for direct fire (arc of fire, line of sight, target acquisition, chance to hit, dice modifiers, results of hit, etc), indirect area fire (artillery), direct area fire (howitzers, etc.), effects on soft targets, tank riders, close assaults, overruns, morale, and a description of the various support weapons (crew served, and man-portable).  Rules exist for weapons such as flame throwers, rockets, and smoke rounds (from regular weapons, and from smoke mortars, etc.).

The book gives some useful generic organization notes (sections, platoons, companies, batteries, etc.).

C2 is described, but it only really affects calls for indirect area fire missions (artillery).  And the rules are pretty clear, that if a spotter is in radio contact (and he is assumed to be), and the firing battery is available (which it is, unless it is on table and moving), then fire missions arrive in the same turn they are called for.

Good rules are presented for terrain and its very specific (tactical) effects on line of sight and target acquisition.

But, the bulk of the book is given over to tables.  The first set of tables (Table A through Table H) are tables in support of the rules - things like acquisition, the chance to score a hit, hit location, the effects of HE rounds, and the area of artillery are just some of these.  But the next set of tables are the data tables on equipment.  All of the major combatants of Europe in the period covered (43-45) are present - the Americans, British, Russians and Germans.  Each nationality has a page (or two in the case of the Germans) of information about AFVs.  There is also a page of information about weapons for each nationality (but Americans and British are combined).

Finally, some additional equipment tables exist, detailing soft skin vehicles, and the more common artillery pieces. This is followed up by the appendices, which cover a wide variety of additional equipment (less common vehicles and weapons) that are not on the main charts, as well as a section on points values, and finally a discussion on some of the special ammo used in the war (like the American High Velocity Armor Piercing, or HVAP round).

There is nothing revolutionary here in these rules, except maybe in how the fire phase is handled.  That, even, is not too unique.  What works is that these rules have a nice simplicity, and they are also appealing to those who like all the detail about their tanks.  For some reason, in the early and mid 80s, we loved this sort of thing (see more discussion on this "cult of detail" when I review Seekrieg, later on in this series of articles).  One of the other WW2 rulesets I played and plan to cover, is Angriffe.  It also covers the same spread of data (to almost the same level of detail).  The WRG WW2 rules get away from this, somewhat, by introducing armor class for tanks (in the WRG rules, each AFV is rated a letter, from A to F, for front and side armor, rather than using mm of thickness, as Overwatch and Angriffe do).

But what really seemed to work in these rules, is that the model for combat was at the same time very specific, and also abstract enough to move quickly.  It was very specific, in that it covered (mostly) armored warfare in Europe, in the period 1943-45.  Meaning, that most of the rules were covering tank-on-tank action, with some considerations for artillery, and even less for infantry.  On the other hand, this narrow focus allowed a bit of abstraction to creep in.  Most AFVs of the time have a very similar set of physical design features that lend themselves to a generic hit location system (this is an abstraction).  The "to hit" roll is based on three things, really - what is the gun class (i.e. - the accuracy of the optics used for targeting the weapon, combined with the inherent accuracy of the weapon itself), whether the target or firer are stationary (or moving), and a modifier for range.  That is it - this makes it simple to represent, but it is an abstraction (what about crew training?  what about visibility?  what about the state of the equipment?).  Finally, weapon effects from direct fire weaponry is an abstraction.  Does the stated penetration of the round you fired, at the range you fired, exceed the listed armor for the vehicle, at the hit location you determined your shot to strike?  If so, then the vehicle is destroyed.

Walking through the combat adjudication is a nice way to see the simplicity of the rules.

First, table A gives you the knowledge of who you can see. This is based on target class (infantry, artillery vehicles, etc), and is given in yards.
Table A - Target Acquisition

Next, table B gives you the chance, as described above, of scoring a hit.  This is a percentage value based on a matrix (for each gun class) of whether the shooter or target are moving or stationary.  This is modified by -20% for each (round up) 1000 yards (20 inches).
Table B - Hit Determination

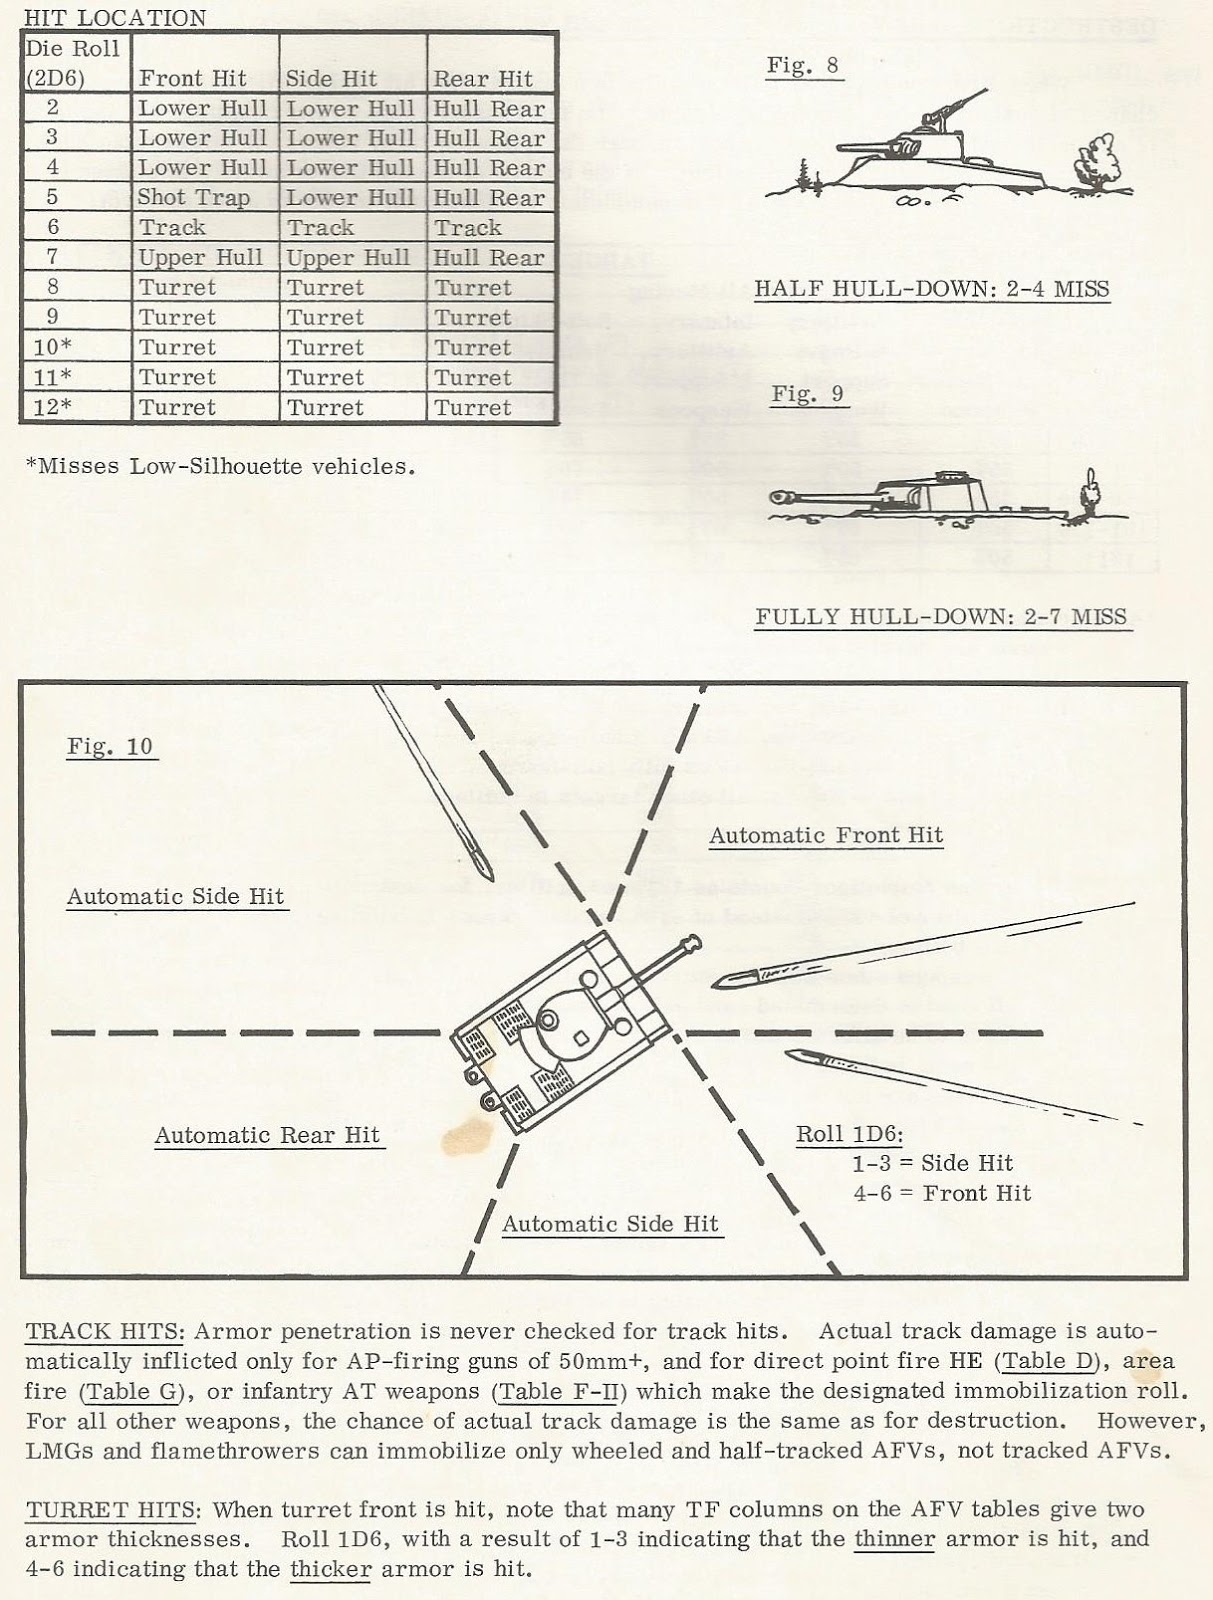
Table C is a 2d6 roll to see where the hit strikes.  This incorporates rules for hull down targets, and also for low-silhouette targets.
Table C - Hit Location

Table D gives you the information needed to determine if direct fire HE rounds are effective against a target (firing that big 152mm howitzer might be nasty vs a light tank, but what about vs infantry in a building?).
Table D - HE Effects

Table E is a set of tables for determining the effects of machine gun fire.
Table E - MG Effects

Table F is a set of charts detailing infantry weapons and their effects.
Table F - Small Arms Fire

Table G is a set of charts for resolving area fire attacks (artillery missions).  It is done by determining the number of weapons, and caliber, and this sums up to an attack factor.  That factor is then matrixed against the target types in the fire mission area (which is detailed on Table H), and a chance for a kill results.
Table G - Artillery Effects

That is it for the rules.  It is driven by the charts, which are very straight forward.  It is a good set of rules, if not brilliant in innovation.  However, for us it worked very, very well.  One of the things that is of interest to the WW2 armor battle wargamer is the interaction of different weapon systems.  By taking a look at (Table P) the Russian weapon data here:
Table P - Russian Gun Penetration

And (Table L) the German AFV data here (the first half, there are two sheets of German AFVs):
Table L - German AFVs

We can see that a round fired by a Russian 76.2mm L41 gun (the weapon on most models of the T-34/76) at about 1000 yards, can penetrate 73mm of armor.  If you compare that to the front upper-hull armor of most German AFVs, you can see that it won't kill a Mk IV F2, G, H, J or any of the big cats (Panther, or either mark of Tiger).  It won't kill a StugIII, or the big Self Propelled Anti-Tank pieces (Elefant, Jagdtiger, etc).  So, if you are firing a T-34/76, you should either be prepared to get a side shot against those German targets, or maybe hope you hit a softer piece of the tank (although the turret is usually worse...).  It is that kind of data that tank nerds (like I used to be, and still devolve into from time to time) really like.

Overwatch is a far cry from the abstracted details in a game such as Flames of War, or Blitzkrieg Commander, although I really like BC (mostly for the innovative rules, and the way it incorporates infantry, making the combined arms operation quite important).  And it is very much a different game than Bolt Action.  It was really a different game from the contemporaries of its own time (Angriffe and Tractics), but it did compete, somewhat, with Jagdpanzer and possibly the WRG 1925-1950 rules  The latter played faster (and I had some extremely enjoyable games of the WRG WW2 rules), but they sacrificed more detail in the quest for faster play..

With Overwatch, you get all that neat data driven analysis and comparison, and the game moves quickly.  That's probably why we played it for most of the 80s.

Lord of the Manor - design in progress

(This is a continuation of my thoughts about a mapless Medieval campaign supporting tactical medieval rules, such as Chainmail.  This represents just some further thoughts about a random generation system for determining what "lands" would be in your demesne.)

Working on the Medieval campaign rules some more has turned into me experimenting with distributions and stochastic curves, as I look at using a 3d6 system, and a 2d6 system.  Here are both charts, presented as I was experimenting with them.

3d6 Version2d6 Version
 3 - Orchards
 4 - Vineyard
 5 - Port
 6 - Town
 7 - Free Land
 8 - Forest
 9 - Forest
10 - Farm
11 - Farm
12 - Pasture
13 - Pasture
14 - Free Land
15 - Church
16 - Highlands
17 - Fish Ponds
18 - Orchards
 2 - Vineyard
 3 - Port
 4 - Town
 5 - Freeland
 6 - Forest
 7 - Farm
 8 - Pasture
 9 - Church
10 - Highlands
11 - Fish Ponds
12 - Orchards


In both cases, I think I got the frequency correct, of the different types of Lands, in relationship to each other.  However, I am thinking that I will go with the 2d6 system, because it means that the land types at both legs of the system (meaning, Vineyards, Ports, Fish Ponds, and Orchards) are extremely rare in the 3d6 system, and I did not intend that to happen.

Next will be assigning troop types to the different lands... and working on the limits and options inherent in the economic system (money sources, money sinks, and market options).